Flutter — Creating a Custom URL Shortener as an Alternative to Firebase Dynamic Links

The purpose of writing this article is that Firebase has decided to completely shut down its Firebase Dynamic Links service on August 25, 2025. Although this situation saddens us, we had to find an alternative. I wanted to solve this with other services, but since I couldn’t find a service that exactly met my needs and also thought that integrating another service just for app linking was overkill, I decided to create a custom URL shortener through my web application.
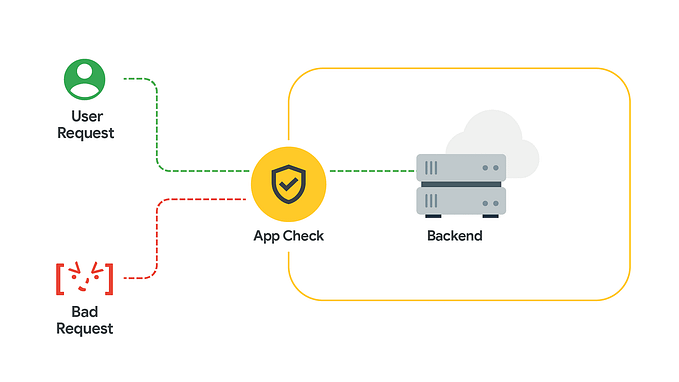
Firebase Dynamic Links is a service that directs users to a specific page in your app if the app is installed on their phone, or to the store where your app is located if it is not installed.
In this article, I will try to show you how to create Creating Custom URL Shortener with your web application.
First, here are the necessary packages for opening the desired page in our Flutter application:
dependencies:
  app_links: ^6.3.0
  dio: ^5.6.0
  share_plus: ^10.0.2
After installing the packages in our app, you can either open a separate repository and create your own web application, or you can create it within your Flutter app folder. To make it easier to access, I will try to explain it through a single repository.

We open a folder named web-app within the folder where the Flutter app is located. In this article, I will use Astro, one of the web frameworks. You can use any framework you prefer. Astro is a great framework for content-driven websites.
This section contains the steps we need to follow to start the Astro web application. If you want, you can skip this part and access more information via the link provided.
To install Astro in the web-app folder, run the following commands:
cd web-app/
npm init --yes
npm install astro
After running the above commands, change the package.json file in the web-app folder as shown below:
"scripts": {
    "dev": "astro dev",
    "start": "astro dev",
    "build": "astro build",
    "preview": "astro preview"
 },
To ensure Astro is successfully installed and working, open a file at src/pages/index.astro and paste the following code. You can test it by switching to the web-app directory via terminal and running npm run start
---
// Welcome to Astro! Everything between these triple-dash code fences
// is your "component frontmatter". It never runs in the browser.
console.log('This runs in your terminal, not the browser!');
---

<html>
  <body>
    <h1>Hello, World!</h1>
  </body>
</html>
<style>
  h1 {
    color: orange;
  }
</style>
If you want your website to be indexed more easily by search bots, you can open a public/robots.txt file and copy-paste the following code:
# Example: Allow all bots to scan and index your site.
# Full syntax: https://developers.google.com/search/docs/advanced/robots/create-robots-txt
User-agent: *
Allow: /
To change the configurations of our Astro project and also include tools like React, Tailwind, etc., you can create a astro.config.mjs file in the main directory and paste the following code:
import { defineConfig } from 'astro/config';

// https://astro.build/config
export default defineConfig({});
If you plan to write TypeScript in your web application, you can create a file tsconfig.json in the root directory of the app and configure it as follows:
{
  "extends": "astro/tsconfigs/base"
}
You can also use strict or strictest options if you want. For more details, you can check this link.
After completing the necessary configurations for the Astro web application, we can move on to writing the custom short URL API for the mobile application.
We will use Firebase Realtime Database to save the information coming from the mobile app.
For this, we create a new Firebase project. In the project we created, we go to the Realtime Database section and click on “Create Database.” After creating the database, go to the project settings page and download the JSON file from the Service Accounts section.
Using the information in the downloaded JSON file, we create a .env file in the root directory of the app to provide Firebase integration and fill in the necessary information as follows:
FIREBASE_PRIVATE_KEY_ID=
FIREBASE_PRIVATE_KEY=
FIREBASE_PROJECT_ID=
FIREBASE_CLIENT_EMAIL=
FIREBASE_CLIENT_ID=
FIREBASE_AUTH_URI=
FIREBASE_TOKEN_URI=
FIREBASE_AUTH_CERT_URL=
FIREBASE_CLIENT_CERT_URL=
FIREBASE_DATABASE_URL=
After filling in our .env file, we configure TypeScript for ambient declarations to use env in our Astro project by editing the src/env.d.ts file as follows:
/// <reference path="../.astro/types.d.ts" />
/// <reference types="astro/client" />

interface ImportMetaEnv {
    readonly FIREBASE_PRIVATE_KEY_ID: string;
    readonly FIREBASE_PRIVATE_KEY: string;
    readonly FIREBASE_PROJECT_ID: string;
    readonly FIREBASE_CLIENT_EMAIL: string;
    readonly FIREBASE_CLIENT_ID: string;
    readonly FIREBASE_AUTH_URI: string;
    readonly FIREBASE_TOKEN_URI: string;
    readonly FIREBASE_AUTH_CERT_URL: string
    readonly FIREBASE_CLIENT_CERT_URL: string;
  }

interface ImportMeta {
    readonly env: ImportMetaEnv;
}
To establish a Firebase database connection, we need to install the following Firebase package:
npm i firebaseAfter installing Firebase, open the src/firebase/database.ts file and initialize the database with the following code:
import { initializeApp } from 'firebase/app';
import { getDatabase } from 'firebase/database';

const firebaseConfig = {
    apiKey: import.meta.env.FIREBASE_API_KEY,
    authDomain: import.meta.env.FIREBASE_AUTH_DOMAIN,
    databaseURL: import.meta.env.FIREBASE_DATABASE_URL,
    projectId: import.meta.env.FIREBASE_PROJECT_ID,
    storageBucket: import.meta.env.FIREBASE_STORAGE_BUCKET,
    messagingSenderId: import.meta.env.FIREBASE_MESSAGING_SENDER_ID,
    appId: import.meta.env.FIREBASE_APP_ID,
  }


const app = initializeApp(firebaseConfig);

const database = getDatabase(app);

export default database;
After establishing the database connection, we will create an endpoint to save the incoming data to the database and return a short URL as a response.
First, we need to install the crypto-js package to generate a unique short URL:
npm i crypto-jsAfter installing the package, open the src/pages/api/generate_short_link.ts file and paste the following code:
import { ref, set } from 'firebase/database';
import database from '../../firebase/database';
import CryptoJS from 'crypto-js';

export const prerender = false;

const db = database;

export const POST = async ({ request }) => {
  console.log("Request received");

  try {
    const body = await request.json();

    let originalLink = body.originalLink;
    let androidPackageName = body.androidPackageName;
    let iosBundleId = body.iosBundleId;
    let title = body.title;
    let description = body.description;
    let imageUrl = body.imageUrl;

    const randomBytes = CryptoJS.lib.WordArray.random(4);
    const shortId = randomBytes.toString(CryptoJS.enc.Hex);

    const shortLink = `https://custom-domain/link/${shortId}`;

    await set(ref (db, 'short-links/' + shortId), {
      originalLink,
      androidPackageName,
      iosBundleId,
      title,
      description,
      imageUrl,
      shortLink
    });


    return new Response(
      JSON.stringify({
        shortLink
      }),
      {
        status: 200,
      }

    )
  } catch (error) {
    console.error(error);
    return {
      status: 500,
      body: {
        message: "Error generating short link"
      }
    };
  }
}- To generate a short URL, we parse the data coming from the mobile app, save it to the database, and return a unique URL as a response.
- Some of the incoming data may be optional. Here, I tried to create it according to the parameter structure that Firebase Dynamic Links takes as dynamic links.
In Astro’s default configuration, it tries to generate a static web-app. However, since we want to make a request to a server, we need to change the Astro configuration in astro.config.mjs as follows:
import { defineConfig } from 'astro/config';

// https://astro.build/config
export default defineConfig({
    output: 'hybrid',
});
Here, hybrid indicates that it will be both server-rendered and a static web app. Also, if you are creating any endpoints or dynamic web pages, you need to add the following to the relevant page:
export const prerender = false;When we run our Astro application, to test whether the API is working successfully, you can make the following cURL request:
curl --location 'http://localhost:4321/api/generate_short_link' \
--header 'Content-Type: application/json' \
--data '{
    "originalLink": "originalLink",
     "androidPackageName":"" ,
      "iosBundleId":"",
      "title": "",
      "description": "",
      "imageUrl": ""
}'
We wrote the API endpoint required to generate a link. Now we will catch the requests coming to the generated link and redirect them to the original link if the app is installed, or to the store if it is not installed.
Also, to display the image, title, and description related to the link in the preview section when the link is shared, we need to use OpenGraph meta tags.
We open a file at src/pages/link/[shortId].astro and paste the following code:
---
import { child, get, ref } from 'firebase/database';
import database from '../../firebase/database';

export const prerender = false;

// Get the shortId from the route params
const { shortId } = Astro.params;

// Fetch the data from Firebase Realtime Database
const fetchData = async (shortId: String) => {
    const dbRef = ref(database);
    const response = await get(child(dbRef, `short-links/${shortId}`));
    const data = response.val();
    return data;
};

let title = '';
let description = '';
let imageUrl = '';
let originalLink = '';

const data = await fetchData(shortId);

if (data) {
    title = data.title;
    description = data.description;
    imageUrl = data.imageUrl;
    originalLink = data.originalLink;
}

const userAgent = Astro.request.headers.get('user-agent');
let fallbackUrl = '';

// Detect platform and determine the fallback URL
if (/android/i.test(userAgent)) {
  fallbackUrl = data.androidPackageName ?  `https://play.google.com/store/apps/details?id=${data.androidPackageName}` : 'https://custom-domain';
} else if (/iphone|ipad|ipod/i.test(userAgent)) {
  fallbackUrl =  data.iosBundleId ? `https://apps.apple.com/app/${data.iosBundleId}` : 'https://custom-domain';
}

const htmlContent = `
    <html lang="en">
      <head>
        <meta charset="UTF-8">
        <meta name="viewport" content="width=device-width, initial-scale=1.0">
        <title>${title}</title>

        <link rel="manifest" href="/manifest.json">

        <!-- Meta Tags for SEO -->
        <meta name="title" content="${title}" />
        <meta name="description" content="${description}" />

        <!-- Twitter Card Meta Tags -->
        <meta name="twitter:card" content="summary_large_image" />
        <meta name="twitter:title" content="${title}" />
        <meta name="twitter:description" content="${description}" />
        <meta name="twitter:image" content="${imageUrl}" />

        <!-- Open Graph Meta Tags -->
        <meta property="og:title" content="${title}" />
        <meta property="og:description" content="${description}" />
        <meta property="og:image" content="${imageUrl}" />
        <meta property="og:url" content="${originalLink}" />
        <meta property="og:type" content="website" />
      </head>
      <body>
        <div id="link-preview">
          <h1>${title}</h1>
          <p>${description}</p>
          <img src="${imageUrl}" alt="Image Preview" />
        </div>


       <script>
          window.onload = async function() {
          const userAgent = navigator.userAgent.toLowerCase();
          const isAndroid = userAgent.includes('android');
          const isIOS = /iphone|ipad|ipod/.test(userAgent);

            if (isAndroid || isIOS) {
              if ('getInstalledRelatedApps' in navigator) {
                try {
                  const relatedApps = await navigator.getInstalledRelatedApps();

                  if (relatedApps.length > 0) {
                    // App is installed, redirect to the app
                    window.location = '${originalLink}';
                  } else {
                    // App is not installed, fallback to the app store
                    window.location = '${fallbackUrl}';
                  }
                } catch (error) {
                  console.error('Error checking related apps:', error);
                  // Fallback to the app store if there's an error
                  window.location = '${fallbackUrl}';
                }
              } else {
                window.location = '${fallbackUrl}';
              }
            }
          };
        </script>
      </body>
    </html>
  `;


if (originalLink) {
  let base64 = Buffer.from(originalLink).toString('base64');
    return new  Response(
        htmlContent, {
        status: 200,
        headers: {
            'Content-Type': 'text/html',
            'Location': base64
        },
    });
} else {
    return new Response('Not Found', { status: 404 });
}

---

<html lang="en">

<head>
    <meta charset="UTF-8">
    <meta name="viewport" content="width=device-width, initial-scale=1.0">
    <title>{title}</title>

    <!-- Meta Tags for SEO -->
    <meta name="title" content={title} />
    <meta name="description" content={description} />

    <!-- Twitter Card Meta Tags -->
    <meta name="twitter:card" content="summary_large_image" />
    <meta name="twitter:title" content={title} />
    <meta name="twitter:description" content={description} />
    <meta name="twitter:image" content={imageUrl} />

    <!-- Open Graph Meta Tags -->
    <meta property="og:title" content={title} />
    <meta property="og:description" content={description} />
    <meta property="og:image" content={imageUrl} />
    <meta property="og:url" content={originalLink} />
    <meta property="og:type" content="website" />
</head>

<body>
    <div id="link-preview">
      <h1>${title}</h1>
      <p>${description}</p>
      <img src="${imageUrl}" alt="Image Preview" />
    </div>
</body>

</html>- We retrieve the shortId parameter from the https://custom-domain/link/shortId link we created, fetch the previously stored data from the database, and set it accordingly.
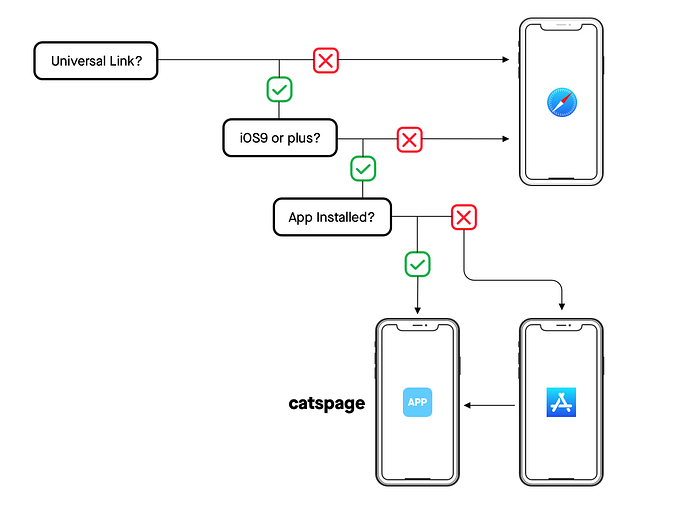
- If the app is not installed on the user’s phone, we determine the operating system using the user-agent header and set the fallbackUrl.
- When the user shares the link we created, we add Open Graph meta tags in the HTML content returned in the response to display data like the title, description, and image of the link.
- If the original link is successfully retrieved, we encode the original link in base64 format as the response. The primary reasons for this conversion are to avoid issues with links longer than 255 characters, prevent problems with ASCII characters, and provide a layer of encryption.
Lastly, in the web application we developed, we can determine whether our app is installed on the phone using the getInstalledRelatedApps function.
For this function to work correctly, we need to create a public/manifest.json file and fill it out as follows:
{
    "name": "App Name",
    "short_name": "App Name",
    "start_url": "/",
    "display": "standalone",
    "related_applications": [
      {
        "platform": "play",
        "url": "https://play.google.com/store/apps/details?id=com.x.x(android package name)",
        "id": "android package name"
      },
      {
        "platform": "itunes",
        "url": "https://apps.apple.com/app/app name/id(app id)",
        "id": "app id"
      }
    ]
  }
You need to change the “app name”, “android package name”, and “app id” fields in this file. These platform-specific URLs should be the store URLs for your app.
To create an app link between our mobile application and web application, we also need to upload the public/.well-known/assetlinks.json and public/.well-known/apple-app-site-association files.
public/.well-known/apple-app-site-association
{
    "applinks":{
       "apps":[

       ],
       "details":[
          {
             "appID":"teamId.app bundle id",
             "paths":["*"]
          }
       ]
    }
}
public/.well-known/assetlinks.json
[
  {
    "relation": [
      "delegate_permission/common.handle_all_urls"
    ],
    "target": {
      "namespace": "android_app",
      "package_name": "android package name"
      "sha256_cert_fingerprints": [
         app signing certificates
      ]
    }
  }
]
After successfully completing our web application, we need to deploy it. In this article, I will deploy it using the Vercel adapter, but you can use a different adapter if you wish.
First, we add the Vercel package to our Astro project:
npm i @astrojs/vercelThen, we modify the astro.config.mjs file as follows:
import { defineConfig } from 'astro/config';
import vercel from '@astrojs/vercel/serverless';

// https://astro.build/config
export default defineConfig({
    output: 'hybrid',
    adapter: vercel(),
});
To deploy quickly, you can add the following script to the package.json file:
"scripts": {
...
"deploy": "astro build && vercel deploy --prod"
}
After successfully deploying our web application, we can generate links and perform navigation operations via our mobile application.
First, we need to add the custom domain to the AndroidManifest.xml file for Android:
<activity
    ...
    <intent-filter android:autoVerify="true">
        <action android:name="android.intent.action.VIEW" />

        <category android:name="android.intent.category.DEFAULT" />
        <category android:name="android.intent.category.BROWSABLE" />

        <data android:scheme="https" />
        <data android:host="custom-domain" />
    </intent-filter>
</activity>
For iOS, after opening the iOS folder in Xcode,
- Navigate to the Runner/Signing & Capabilities tab
- Click + Capability to add Associated Domains.
- After completing this process, you need to add the link in the form of applinks:custom-domain.
After finishing the configuration, all that remains is to catch the app link and open the relevant page within the app.
To both share an app link and handle the app link within the application, we create a file named handle_app_links.dart:
import 'dart:convert';
import 'dart:developer';

import 'package:app_links/app_links.dart';
import 'package:dio/dio.dart';
import 'package:flutter/material.dart';

final navigatorKey = GlobalKey<NavigatorState>();
const vercelBackendUrl =
    'https://examplecustomurlshortener-hasankarlis-projects.vercel.app';

class HandleAppLinks {
  HandleAppLinks._();

  static final instance = HandleAppLinks._();

  final _appLinks = AppLinks();

  bool isRedirecting = false;

  Future<void> init() async {
    log('HandleAppLinks init');
    await _initAppLinks();
    await _streamAppLinks();
  }

  Future<void> _initAppLinks() async {
    log('HandleAppLinks _initAppLinks');
    final appLink = await _appLinks.getInitialLink();
    if (appLink != null) {
      log('HandleAppLinks _initAppLinks appLink: $appLink');
      await _handleAppLink(appLink);
    }
  }

  Future<void> _streamAppLinks() async {
    log('HandleAppLinks _streamAppLinks');
    _appLinks.uriLinkStream.listen((Uri uri) async {
      log('HandleAppLinks _streamAppLinks uri: $uri');
      await _handleAppLink(uri);
    });
  }

  Future<void> _handleAppLink(Uri uri) async {
    if (isRedirecting) return;
    log('HandleAppLinks _handleAppLink uri: $uri');
    isRedirecting = true;
    final deepLink = await _getOriginalLink(uri);
    final path = deepLink.split('/').last;
    switch (path) {
      case 'profile':
        await navigatorKey.currentState!.pushNamed('/profile');
      case 'notification':
        await navigatorKey.currentState!.pushNamed('/notification');
      default:
        await navigatorKey.currentState!.pushNamed('/');
    }
    isRedirecting = false;
  }

  Future<String> _getOriginalLink(Uri uri) async {
    final dio = Dio();
    String deepLink = '';
    try {
      final response = await dio.head<void>(uri.toString());
      final headers = response.headers.map;
      for (final key in headers.keys) {
        if (key == 'location' && headers[key] != null) {
          final decodedBase64 = base64.decode(headers[key]!.first);
          deepLink = utf8.decode(decodedBase64);
        }
      }
    } catch (e) {
      log('_getOriginalLink error: $e');
    }
    return deepLink;
  }

  static Future<String> generateShortLink(String link) async {
    final dio = Dio();

    final title = 'My Link $link';
    const description = 'My Link Description';
    final imageUrl =
        'https://picsum.photos/250/250?random=${DateTime.now().millisecondsSinceEpoch}';
    const androidPackageName = 'com.hasankarli.exampleCustomUrlShortener';
    const iosBundleId = 'com.hasankarli.exampleCustomUrlShortener';

    final response = await dio.post<String>(
      '$vercelBackendUrl/api/generate_short_link',
      data: {
        'originalLink': vercelBackendUrl + link,
        'androidPackageName': androidPackageName,
        'iosBundleId': iosBundleId,
        'title': title,
        'description': description,
        'imageUrl': imageUrl,
      },
    );

    final decoded = jsonDecode(response.data!) as Map<String, dynamic>;

    return decoded['shortLink'] as String;
  }
}- We initialize the getInitialLink method and uriLinkStream method from the app links object to handle the link when the app is closed or open. This way, both cases are covered.
- We obtain the original link by checking the location key in the header of the short link.
- Navigate to the relevant page within the app using the navigatorKey variable by looking at the last path.
Finally, to initialize HandleAppLinks and define routes, we modify main.dart as follows:
import 'package:example_custom_url_shortener/handle_app_links/handle_app_links.dart';
import 'package:example_custom_url_shortener/home/home_page.dart';
import 'package:example_custom_url_shortener/notification/notification_page.dart';
import 'package:example_custom_url_shortener/profile/profile_page.dart';
import 'package:flutter/material.dart';

void main() {
  runApp(const MainApp());
}

class MainApp extends StatefulWidget {
  const MainApp({super.key});

  @override
  State<MainApp> createState() => _MainAppState();
}

class _MainAppState extends State<MainApp> {
  @override
  void initState() {
    super.initState();
    HandleAppLinks.instance.init();
  }

  @override
  Widget build(BuildContext context) {
    return MaterialApp(
      debugShowCheckedModeBanner: false,
      navigatorKey: navigatorKey,
      initialRoute: '/',
      routes: {
        '/': (context) => const HomePage(),
        '/profile': (context) => const ProfilePage(),
        '/notification': (context) => const NotificationPage(),
      },
    );
  }
}
We have successfully implemented both custom URL generation and navigation within the app using the generated custom URL.
Note: It may take some time for your app links to successfully integrate with your web application. If your links appear as unverified on Android devices, you can test them by downloading the app through an internal test on the Play Store
Thank you for reading, I hope it is helpful. If you have any questions, feel free to ask on LinkedIn.
You can access the source code of the application from the link below.